Wednesday, 2 October 2013

Shellac Bluesky UV Gel Nails - Rose Bud


As you know from my previous post ‘Dark Lava Nails’, I am obsessed with UV gel nails!


I have so many different colours now and I am always looking for different shades to add to my collection!

I change my nail colour around once a week depending how long my previous colour lasts. It should last around 3 weeks but I have an awful habit of nibbling the gel polish off! (oopsy). I also get bored of nail polish colours quite quickly so I like to switch and change often. 

This week I have decided to go with this beautiful rose pink colour from the Bluesky Shellac range. This colour is called ‘Rose Bud’. I think this is a perfect name for this polish as it definitely lives up to its name with its gorgeous rose shade of pink. I think this is a really nice colour which is perfect for any season and it helps to brighten up outfits, especially in this dull & rainy season. This is a matte polish which looks lovely on its own but I decided to add glitter, so for this I used my IBD Gel Polish – Fireworks over the top of the colour. I also used this on top of the polish in my Dark Lava nails post. 

This nail colour will definitely be making a few appearances on my nails throughout the year and I am looking forward to purchasing more colours! 

Thank you for reading. 

Nada 

xxx

Sunday, 29 September 2013

Top 5 Autumn Beauty Picks

Beautysets - Top 5 Autumn Beauty Picks


Lately I have been really enjoying switching up my make-up and experimenting with some autumnal shades. Up until recently I would always shy away from bold colours whether that be in an eyeshadow or lipstick format and would always stick to my beloved neutral shades. I must have gone to the dark side as i'm now on the hunt to expand my make-up collection with some new autumn plum/cranberry purchases. 

Here are my top 5 beauty picks for Autumn!

1. Essie - Material Girl
On the nails this is a beautiful dark burgundy shade and up close has red undertones. This shade is very similar to 'Wicked' but it is slightly more on the plum/purple spectrum. I love sporting vampy nails and this shade is probably an all time favourite AW nail varnish shade of mine. 

2. Maybelline 24 Hour Color Tattoo - Metallic Pomegranate
I have to say I absolutely LOVE these color tattoos as the longevity and pigmentation are absolutely amazing. I picked this shade up recently and it is a beautiful cranberry with gold shimmer running through it and will see you right through AW. Just like all the other shades in the range the versatility of them are just great. You can either wear it lightly over the lids just for a wash of colour during the day or you can build it up for a more intense evening look.

3. Rimmel Lasting Finish Matte by Kate Moss - Shade 107
This is a gorgeous deep plum/red shade and is perfect for the colder months to come. Although it is classed as a matte lipstick, the formula is not drying on the lips at all and the lasting power is great. I think this shade would suit many different skin tones and is a great staple to have in anyone's make-up collection. 

4. MAC - Rebel

I know, another lipstick! This one however is more of a dark purple/pink shade. It is a satin finish which means it is soft to apply and is nourishing on the lips. It has quite a decent wear time and ends up leaving a beautiful stain. Rimmel have also just revamped their Moisture Renew line which includes a perfect dupe of this lipstick in the shade 'Glam Plum Fulham'. This lipstick line hasn't yet hit the stores but expect them to be available from October 2nd. 

5. MUA Single Pearl Eyeshadow - Shade 25

The MUA single eyeshadows are brilliant!  For a mere £1 each and such an affordable brand you would think the eyeshadows would be chalky in texture but they are they are so creamy and are a dream to apply! This shade in particular is very similar to MAC 'Cranberry' - it is a beautiful burgundy with a shimmery undertone and would be be great paired with 'Metallic Pomegranate' or simply would be great on its own. 

So that's my top 5 make-up picks for this season. I think the colours are perfect for AW and you can create so many different looks! Whether you feel more comfortable rocking a bright lip with natural eyes or fancy creating a smoky eye with neutral lips then there's something here for you. 


I hope you liked reading this post!
Louise 
xxx


Saturday, 28 September 2013

Sleek Mohawk High Ponytail - Tutorial


I am a huge fan of high ponytails and high buns and think that these are great hairstyles to create if you are looking for a quick, simple hairstyle!

I have created this hairstyle a lot throughout the summer, especially during the hot months! I find having my hair up is a lot fresher and cooler than having hair all around my neck and face when its baking hot outside, so I created different up-dos to prevent my hair from becoming crazy and annoying during the heat and this hairstyle was one of them!
If I am in a rush of a morning and have limited time I will usually turn to a ponytail or a high bun for a quicker hairstyle option. I use these hairstyles for days at work, quick outings to the shops, days when I want to give my hair a break from using heat styling tools or if I am generally having bad hair day!


I created this High ‘Mohawk’ Ponytail in 5-10 minutes; it didn’t take long to create at all! 
If you would like to know how to create this look in a few simple steps then keep on reading! :)

1. Firstly, Depending how you would like your pony tail, you can use a heat styling tool of your choice to create either a straight look, waves or curls! I used my GHD hair straightener to create soft waves. Remember to use a heat protecting spray!! 
2. I sectioned off a portion of hair from the front of my head and tied it in a hair band to keep it away from my face while I created the ponytail.
3.  I took all of my hair and brushed it upwards towards the top of my head, while holding all of the hair in one hand I sprayed hairspray all round the sides of my head and underneath the ponytail. 
4. I then used a fine, bristle brush to remove all of the lumps and bumps to create a smooth finish.
 5. Once all the bumps were removed and I was happy with the smoothness, I tied my ponytail up using 2 hair bands to keep it secure.
6.  I then removed the hair band from the front section, back combed it with a backcombing brush and clipped it back towards the ponytail, I secured this with 2 bobby-pins in the shape of an ‘X’ just in front of where the hair band is for my ponytail. 
7. Lastly, I sprayed my whole hair all over with hairspray.

 Ta Daaaa! A quick, simple & sleek high ponytail!

Nada
xxx


Thursday, 26 September 2013

Dramatic Smokey Eye Make Up Look

I love experimenting with different make up looks and have always loved smokey eyes so I thought I would create this post for you.
 This is a grey smokey eye look which I always find myself creating on a night out! 

If you would like to know what products I used to create this dramatic eye look then keep on reading! :)


Firstly I used my favourite foundation, Maybelline New York Dream Matte Mousse in 048 Sun Beige! I absolutely love this foundation and will never use anything different. Liquid foundations do not work well with my skin at all and no matter which brand it is for some odd reason my skin always ends up looking very cakey and becomes extra oily which isn’t a good look at all! Dream Matte Mousse is perfect for my skin, However it isn’t very moisturising so it probably wouldn’t work as well for people with dry skin.

After I applied my foundation I used MUA pressed powder in shade 4. To be honest you don’t really need a setting powder when using dream matte mousse but as I have slightly oily skin I find it protects my skin against oiliness throughout the day if I add a small amount on my T zone.

I contoured my face using my Sleek Face Form Contour & Blush Palette in shade Light 373. I used the highlighter on top of my cheekbones, down the centre of my nose and on my cupids bow. I then used the contour bronzer on my temples, along the sides of my nose, the top of my forehead and in the hollows of my cheeks. To give my cheeks a rosy glow I used the amazing rose gold blush from this palette on the apples of my cheeks.

Now for the eyes... I started off using a primer on my lids, Primers are great for helping your eye makeup to last all day/night especially if you are using loose powder eye shadows or glitters.
I then used my Barry M intense Black eyeliner pen. I used this just under my waterline along my lower lashes.


 Firstly for the eye shadow I used the lightest cream shade from the new MUA Smokin’ Eye Palette for my eyebrow bones and the corner of my eyes. I then used the lightest shade of grey from the same Eye Palette, I used this all over my lid and blended it up towards my eyebrow bone. I then used the darkest shade of grey which I used on the center of my eyelids. For the outer corners I used the black eye shadow which I also used on my lower lash line. 

Once I had blended the eye shadows I used a small dust of my Bourjois Paris eye shadow number 92. This is a beautiful grey chalky shade with a touch of silver glitter. I used this in the center of my eyelids.

After the eyeshadow was complete I used Rimmel London’s Exaggerate water eyeliner along my lash line.  I then curled my lashes ready for mascara! I used Bourjois Paris Volume Clubbing Dramatic Look Mascara and then finally added my fake eyelashes!
 For my lips I lined them with Jemma Kidds lip line duo, I used the darkest shade for this (neutral), For lipstick I used MAC Patisserie. This is a neutral shade that I thought would be perfect to use with the dramatic eye and it works well to finish the overall look.


There you have it! A Dramatic Smokey Eye look that is perfect for a night out! 
Thank you for reading and hope you enjoyed this post!


Nada

xxx


Tutorial - Autumnal Eye-shadow Look


So as we are now well and truly in the Autumn season, I thought that I would mix up my make-up a bit and experiment with some typical autumnal shades. Up until now you would have thought that I was mad by even considering to step away from my signature bronzey, smokey eye-shadow look that I just have to sport on a daily basis! 
Anyway, lo and behold, I have decided to create a cranberry/plum eye-shadow look that I have tried out a couple of times now and I absolutely love it! 

1. As usual I started off by applying the 'Urban Decay Primer Potion' to my lids to create a base for the eye-shadows to cling to and most of all for them to last all day! You literally only need the tiniest amount of this and I just blend it out with my finger all over the lid. 

2. I then took the shade 'Foxy' from my 'Urban Decay Naked 2' palette which is the perfect neutral eyelid shade and I just applied this with a flat eye-shadow brush all over the lid and up to the brow bone to even out any discolouration, creating the perfect base.

3. Next I used the 'Maybelline 24 Hour Color Tattoo' in the shade 'Metallic Pomegranate' which is a beautiful shade of cranberry with a gold shimmer running through and to begin with I just patted the colour lightly over the lid. I then used a blending brush just to soften any harsh lines and blend the shadow out. 

4. For the inner third of the eye-lid I decided to use a shimmery cranberry/plum shade from MUA in 'Shade 24' and to apply it I used another flat eye-shadow brush to pack on the colour. 

5. To give it that smokey look, I decided to take the shadow 'Conker' from the 'Sleek I-Divine' Palette which I've had for years now and have found that recently I've been reaching for this quite a bit! Anyway the shade is a lovely dark brown but with undertones of red and gold shimmer and I thought this would look great to blend in the outer corners.  

6. To blend all of the eye-shadows and to get rid of any harsh lines, I took the shade 'Chino' from the new MUA 'Matte Ever After' palette with a fluffy eye-shadow brush. This is a great purpley/brown matte transition shade to use in the crease to add some definition to the eye as well as blending some of the eye-shadows slightly up to the brow-bone. After using this shade I then realised that you could also use the shade 'Tease' from the 'UD Naked 2' palette which is very similar!

7 & 8. To ensure that my eyes didn't look too 'top heavy' I took a smudging brush to apply the shade 'Conker' on the outer half of my lower lash line and I also took the MUA 'Shade 24' on the inner half of the lower lash line. I also used the same brush just to blend the two shades together and also to smudge them out a bit to achieve a smokey look. 

9. To highlight the inner corner of the eyes I used the MUA 'Shade 1' eye-shadow which is a beautiful shimmery cream/champagne shade and is perfect for the eyes to appear more open and awake. 

10. To make my upper lash line appear thicker, I applied my favourite liquid liner which is the 'Collection Extreme Felt-Tip Liner'. I find that it is so easy to use and it literally stays put the whole day without transferring on the lid! 

11. I then used the 'Rimmel Scandeleyes' Kohl eyeliner in '001 Black' to use in the waterline and tightline which again is a favourite of mine as it has a really creamy texture so it literally just glides on and again lasts all day!

12. An obvious step - Curl those lashes!

13 & 14. I then used the 'Rimmel Lash Accelerator Endless' mascara which is great at seperating and lengthening the lashes and I then paired this mascara with 'Maybelline: The Rocket' mascara which I find works brilliantly at making my lashes appear more thicker an fuller! I find that both of these mascaras work really well together and neither shed or smudge at all during the course of the day! 

15. It was at this point that I felt that I needed a tiny bit of black eye-shadow in the outer corner of my eyes so I took the shade 'Blackout' from the 'UD Naked 2' palette which is just a matte black eye-shadow and I used a fluffy eye-shadow brush to apply very lightly in a 'v' shape just for some added defintion. I would normally not apply any shadow after using mascara and eyeliner but I felt the look wasn't complete without a bit of black just for some added smokeyness!

There you have it! 
A step-by-step tutorial of how to achieve this autumnal eye-shadow look. I really like it and I certainly plan on using more colourful shades on my eyes! I hope you enjoyed it and I would love to know what you think of this look and if you plan on re-creating it for yourselves! 

Thanks for reading!!

Louise 
xxxx

Sunday, 22 September 2013

MAC – Patisserie Lustre Lipstick Review


On our recent trip to Westfield’s Stratford I purchased this lovely product from the MAC store.  
I have wanted to find a new lipstick that is similar to my natural lip colour for a while now so I went on a mission to find a lovely neutral shade and after swatching around 10 different shades, I came across Patisserie and instantly loved it! 
Patisserie is a beautiful shade of nude pink with peach undertones, exactly what I was looking for!


This lipstick is a lustre so it goes on just like a lipgloss and leaves a beautiful glossy finish!  I love the consistency of this product, it is very moisturising and even though the consistency is similar to a lipgloss it is not sticky at all and is so hydrating!

As this is such a neutral shade of lipstick it think it would look beautiful with a smokey or more dramatic  eye look, it makes your lips look fuller and would suit anyone! I have quite a few brighter lipsticks that I have used throughout summer so I find this neutral shade will suit better for autumn.
I love the name of this lipstick, it really suits the shade and aroma, It smells just like fresh cakes!! (love)


Overall I am very pleased with this lipstick and recommend Patisserie to anyone who is looking for a soft, natural lip shade. I am looking forward to purchasing more MAC lipsticks in the future!


You can purchase this product for £15.00 from MAC stores or online at the MAC website here!
Thank you for taking the time to read!

Nada
xxx


Saturday, 21 September 2013

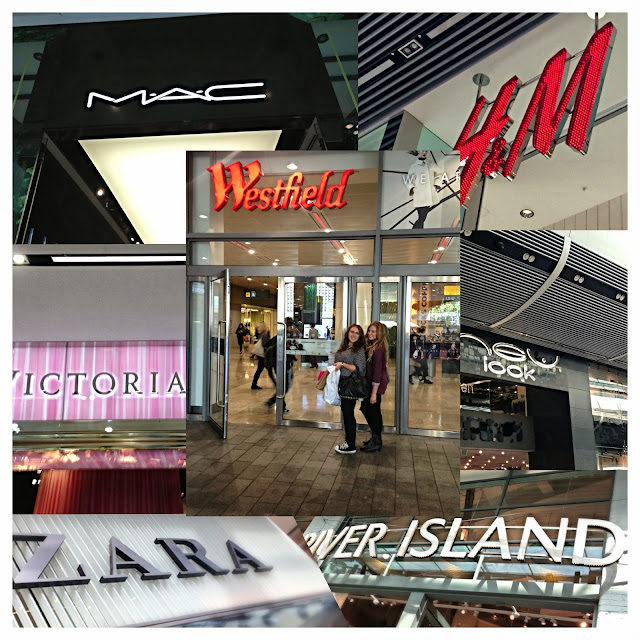
Westfields Shopping Haul!


So Nada, Lizzie (our good friend) and myself took a trip to Westfield's Shopping Centre at Stratford yesterday. Shockingly me and Nada had never been before, but never the less we ended up spending far too much money and came home with purchases we didn't really need, but since when is that out of the ordinary?

So the first shop we went into was Boots and they are currently holding a buy one get one half price mix & match offer on all beauty products and as soon as I saw this I just had to take full advantage! When I came across the Soap & Glory beauty stand I immediately swatched the 'Glow All Out' Illuminating Powder and was really tempted to throw it in the basket. However, after umming and ahhring I thought that it really isn't for me as I do suffer from oily-prone skin and at the best of times really try to avoid a glowy/shiny face. It was then at this point that Nada pointed out 'Peach Party' and oh my what a beautiful product! I absolutely LOVE peachy looking cheeks and this blush brick looks like it will certainly get a lot of love from me! I've not actually heard much about this product from S&G which is quite surprising as the pigmentation is great and it's not too shimmery but leaves a natural flush to the cheeks. PERFECT. I will do a full review and swatches of this blush soon, so look out for that!

I also picked up Seventeen's 'Skin Wow' 3 way highlighter after I'd  heard such good things about this little beauty and couldn't resist purchasing it! I'm so excited that the drugstore have finally brought out a liquid highlighter! I plan to only use this as a liquid highlighter on the top of the cheekbones, down the bridge of the nose on the browbone and cupid's bow. For me personally I do not like the thought of using it as a primer or mixed in with my foundation only because I prefer my skin to look matte over glowy, however I think that it would still look beautiful on others when used in those ways. 

I needed to repurchase the Rimmel 'Lash Accelerator Endless' mascara as it is brilliant for seperating the lashes without any clumping and it is ideal to use everyday. I also picked up another Maybelline 'Color Tattoo' in the shade Metallic Pomegranate which is a perfect autumnal shade and I cannot wait to create a smokey, autumn look featuring this cream eyeshadow. I love the consistency and the longevity of these eyeshadows and there is quite a good selection of shades to choose from!

Next I found myself bee-lining for the Real Techniques stand and I picked up the 'Miracle Complexion Sponge' which has newly been released and I couldn't wait to get my hands on this beauty. I have so much love for the Real Techniques Make-up brushes and recommend them to anyone and everyone! They are so affordable and most of all do a really great job at applying make-up flawlessly! I'm sure this will be a great addition to my ever-expanding collection and I look forward to reviewing this Beauty Blender dupe soon!

Lastly I headed over to Estee Lauder and picked up 'Double Wear Maximum Cover' which I have not previously tried out but due to the great reviews I have heard, I thought this product would work well at covering any blemishes and scarring I have on my face without drying my skin or looking too cakey once blended well. We'll see what happens when I use it!

So after a lunch break which consisted of consuming some lovely cocktails in TGI'S, oh and our favourite... BBQ Ribs we then headed straight to MAC. Originally I had in mind to pick up 'Shy Girl' (lipstick) but unfortunately and heart-breakingly they had sold out! An assistant then recommended the 'Nude: 3 Lip Palette' from the new Antonio Lopez collection. After trying two of the shades on me I didn't take much persuasion to buy it!

We then went into Victoria's Secrets and headed straight to the body mists where I repurchased 'Noir Tease'. I first came across this scent in an LA store and as a sweet scent lover I loved it! It's a brilliant spray to just throw in your handbag and spritz throughout the day!

The Body Shop then called my name to repurchase the 'Coconut Hand Cleanse Gel' but again, without luck being on my side they had sold out! As I had completely run out and needed to buy a new one ASAP I reluctantly settled for smelling the 'Mango' scent. Oh my, this also smells divine, but don't worry Coconut still remains my all-time favourite! I also have been on the hunt for the perfect primer and I have heard that the 'Tea Tree Pore Minimiser' primer is fantastic. As it is specifically aimed at blemish-prone skin I am hoping this may just be the one for me! 

The last port of call was Superdrug and again I knew exactly what I wanted in there. MUA MUA MUA! I was after the two new eye-shadow palettes, 'Smokin' and the 'Matte Ever After'. Luckily they had both of these palettes in stock and I didn't bat an eyelid to snatch them up! I also spotted a single eyeshadow in 'Shade 24' which looks like a lovely shimmery cranberry shade and I think this will pair perfectly with the Pomegranate Color Tattoo.

And there you have it! A rambly post about my beauty purchases from Westfield's. I did also pick up a new leather jacket from the Kelly Brook range in New look which was on my Wishlist post. I think it will get me through autumn and winter and I am excited to start wearing it! 

Anyway thanks for reading my post! Leave a comment if you wish, i'd love to hear your thoughts!

Much Love

Louise 
xxxx


Tuesday, 17 September 2013

Yankee Candle Review


Although this post isn’t much to do with beauty, I felt I had to do a review on these AMAZING candles!  Yankee candles are the best smelling candles I have EVER come across, I am obsessed with lovely scents and I am completely addicted to perfumes, air fresheners and other fresh scented products so when I come across these candles I was in love! 


I have purchased so many Yankee Candle products in the past few years which have included both the medium and large jars, tarts and lots and lots of sampler candles!

I  recently purchased the ‘Fluffy Towels’ large jar Yankee Candle. It has such a gorgeous scent of washing powder with notes of lemon, apple, lavender and lily and smells just like a pile of clean, fresh laundry that is a strong enough scent to fill the room but is not over powering at all.
The smell itself is very clean and calming and quickly fills up the whole room and even into the hallway! The large jars have a burning time of 110 to 150 hours, I have been burning this candle for around 30-35 hours now and it has hardly gone down at all so the burning time is amazing! 


In my opinion Fluffy Towels is definitely one of my favorites out of the whole Yankee Candle range along with Clean Cotton, Coconut Bay and Black Cherry. I have always loved these scents and they are smells I could never get bored of.

I have tried out many different brands of scented candles in the past but have never come across any that have beat Yankee Candles! Although these candles are quite pricey I definitely think they are worth the money and recommend them to everyone!

You can buy these candles from Clinton's Cards or the Yankee Candle website!

I hope you enjoyed reading! :)

Nada
xxx

Saturday, 14 September 2013

Product Empties #1


Rimmel Lash Accelerator Endless

I picked this mascara up a good few months ago now and have absolutely loved it. For me this mascara is great for seperating the lashes and is perfect for those days where you don't fancy wearing too much make-up as it gives the lashes great length without a clump in sight. It holds a brilliant curl and although it's not waterproof, I didn't find that it transferred around the eyes at all either. 


La Roche Posay Effaclar Duo

After hearing brilliant things about this product, I couldn't resist purchasing it. For about a year now I have suffered with blemish prone skin and have struggled to find skin-care products that won't irritate my skin. I have been applying this moisturiser liberally in the chin area both morning and night and it really has changed my complexion! I noticed that my blemishes reduced in size and redness when I used this and most of all the amount of regular blemishes I suffered with decreased. I did find that it dried out my skin, however it was nothing that a good moisturiser couldn't handle. Overall this is a very good moisturiser/acne treatment for those suffering with severe blemishes and I will not hesitate to repurchase!


Garnier Moisture Match Moisturiser for Dry - Very Dry Skin

This is a brilliant moisturiser for skin that tends to be very dry. This was an absolute life-saver in nourishing my skin when I was using the La Roche Posay. It has a very thick consistency and I only needed a pea-sized amount to banish any dry patches. Now that my skin is beginning to clear up and I am only using intensive acne treatments sparingly, a lighter moisturiser is more than adequate at the moment. However as winter is soon on it's way, my skin will certainly be calling for this no doubt. 


Urban Decay Primer Potion 

Earlier this year when I purchased the original Urban Decay Naked palette, this travel sized primer potion came free. I was excited to try this out and I could not possibly love this product any more than I already do. I absolutely love wearing eyeshadow and since using this eye primer as a base, there has been no creasing and my shadow has lasted literally all day. I seriously can't get enough of this product and it certainly has become one of my holy grail products. 


Body Shop Coconut Body Butter

This a very thick and creamy body butter which I love to use after a bath and just before I go to bed. It does take a while to absorb as it is so rich but it is excellent at recovering dry skin without feeling at all sticky. It leaves your skin so soft and smooth and the incredible scent of coconut lingers for what seems like forever. 


Tresemme Heat Defence Spray

I have used this heat defence for years and have re-purchased this product many a times. I regularly use a lot of heat on my hair whether that be blow drying, straightening or curling and this heat defence saves my hair from turning into straw. This product is so light-weight on the hair and does not leave any sticky residue either and lasts a lifetime! It certainly gets my seal of approval. 

Thanks for reading, hope you enjoyed!

Louise 
xxxx

Thursday, 12 September 2013

Blogger Interview by YazzysCorner


So the beautiful Yazzy from Yazzy's Corner is currently featuring an 'Interview Series' of different bloggers over on her blog and we thought that it would be a good idea if we got involved! 
She is really lovely and her blog is great! You can find the interview over on her blog and we really hope that you check it out and that it gives you an insight into our personalities!

Much Love

Louise & Nada
xxx


Every-day Drugstore Make-up Look


 I thought that I would do an easy everyday make-up look that not only can be suitable for school but also for work or on days where you just don't fancy wearing much make-up. For this look in particular I have used some of my favourite go-to drugstore products and the best thing is they're all affordable too! 

I have kept the make-up look fairly simple and as a base used 'Rimmel Wake Me Up' foundation which is brilliant for giving a dewy look to the skin as well as covering any redness/blemishes. On some areas where I needed a little bit of extra coverage, I applied 'Collection, Lasting Perfection Concealer' which I absolutely adore and not a day goes by where I don't use this! It really is my lifesaver!

Moving on to the lids, I applied the 'Maybelline 24 Hour Color Tattoo' in a neutral taupe/bronze shade 'Bad to the Bronze' which is the American alternative to the shade 'On and On Bronze' sold here in the U.K. This cream eyeshadow is perfect for applying in a hurry and can be blended beautifully without the worry of it creasing during the day as well as having serious lasting power! I then applied my trusty 'Extreme 24 Hour Felt Tip Liner' by Collection which is great for applying foolproof liquid liner on the top lash line and I then went in with my Rimmel Scandal Eyes Kohl liner on my waterline and tighline to give my eyes some definition. One of my favourite mascaras that lengthens and thickens my lashes is the Revlon 'Grow Luscious' and I applied this on both my top and bottom lashes. 

For contouring, I used the Sleek 'Face Form Contouring and Blush Palette' in the shade 'Light' which includes a matte bronzer and is brilliant for giving definition to the face, I used this in the hollows of my cheeks, through the temples and along the jawline. In the same palette I also used the blusher on the apples of my cheeks which is a rose gold shade (very similar to Nars Orgasm) and it is great for giving some warmth to the face. The highlighter in this palette is also brilliant and I used this on my brow bone, down the bridge of my nose and along the tops of my cheekbones to make my skin look more radiant. To take away any unwanted shine and to keep my make-up all in place I used the Rimmel 'Stay Matte' setting powder down the centre of my face which is where I normally suffer from oilyness as the day wears on. 
To finish off the look I then applied the Revlon 'Colourburst Lip Butter' in my favourite shade, 'Sugar Frosting' to give my lips a wash of colour. 

There you have it. A very quick and easy everyday make-up look which is so versatile and most of all it won't break the bank as well!

Hope you liked it! 

Louise xxx

Rimmel Wake me Up Foundation - 103 True Ivory
Collection Lasting Perfection Concealer - Medium 3
Maybelline 24 Hour Color Tattoo - Bad To The Bronze
Collection Extreme 24 Hour Felt Tip Liner - Black 
Rimmel Scandel Eyes Waterproof Kohl Kajal Eyeliner - 001 Black
Revlon Grow Luscious Plumping Mascara - 001 Blackest Black
Sleek Face Form Contouring and Blush Palette - Light
Rimmel Stay Matte Powder - 001 Transparent
Revlon Colourburst Lip Butter - Sugar Frosting


UV Gel Polish Review - Dark Lava Nails


I am obsessed with painting my nails but after years of using drugstore polishes I found that they chip quickly and I got tired of re-painting my nails over and over every few days so I wanted to try a better option. 18 months ago I had my nails done by a friend with UV IBD Gel Polish in the Salon before I went on holiday, I had heard great stories about Gel Nails and thought I would give it a try, I was amazed by how long it lasted! After week of snorkeling, water parks and climbing Greek mountains & fortresses my nails still looked the same as when I left the salon! No chips, no smudges, and no flaking nail polish! They ended up lasting around 2-3 weeks.

Around 8 months ago I decided to buy a whole UV Gel Machine and Gel Nail Kit to do my nails myself and it is definitely money well spent! I love being able to do my own nails whenever I like with polish that lasts for weeks! I have bought a lot of different colours now and am looking forward to buying more in the future. 


As Autumn is making a appearance I wanted to step away from the summer neons and purchase some darker autumn colours, My most recent Gel Nail Polish is from the Bluesky range, I ordered the colour 'Dark Lava' which is a deep purple that is beautiful! I paired this up with a IBD Glitter polish 'Fireworks' which adds a lovely sparkle and finishes the nail look.


If you are interested in purchasing any of these products, you can buy them all from Amazon! 

For the UV Gel Nail Machine click here! For the BlueSky Dark Lava Gel Polish click here! :)


I definitely recommend trying out UV Gel Polish, it has changed my life! 

Thankyou so much for taking the time to read :)

Nada
xxx 


Tuesday, 10 September 2013

Transitional Autumn Style Wishlist


So as we now find ourselves braving the colder weather that's just hit us and as we all know, a new season means a whole new wardrobe (well for me anyway that is), here are my top autumn style picks that I could really do with right now! 

Topshop MOTO Blue Jamie Jeans

A good pair of skinny jeans is essential in any wardrobe and I absolutely love them as they are so versatile and go with absolutely anything and can transform any outfit from day to night! The perfect pair will hug you in all of the right places and look flattering on any figure. These are a must-have in the cold weather as they will keep you warm and if it gets really cold then you can always throw on a pair of tights underneath!


ZARA Leather City Bag with Pockets and Zips

This ZARA handbag is stunning! I am a lover of ZARA bags in general with the standard City Bag being my all-time favourite but this one has also caught my eye! ZARA seems to have relaunched the much loved City Bag and brought out the mother of all bags (if that was even possible). I like having a big bag that you can fit everything in and I think that you can't beat having a black bag, it's so classic, and will go with any outfit! 


White Leather Converse

I pretty much live in Converse's as they are really comfortable and are brilliant for day-time wear. They are great paired all year round with absolutely anything and this leather pair in particular have a different look to them and will look great this season. They will probably fair better than the standard canvas Converse in the wetter weather too!


Topshop Cream Knitted Embellished Jumper

This jumper is just beautiful! I love the embellished diamentes on the shoulders which looks really stylish and the cream colour is so versatile! This jumper is sure to keep you warm when the weather turns cold and will look great with layered pieces underneath! 


Kelly Brook at New Look Black Leather Jacket

I have a bit of an obsession with leather jackets and every year I just have to get myself a new one! I think they are great for just chucking on over any outfit and gives it that edgier look! Every outfit I wear just looks complete with my leather jacket and if I could wear it all day everyday then I would! This is my pick for this season and I can't wait to get my hands on it.. I deserve a little treat right?


I hope you like some of my picks on my wishlist for this month and maybe it's given you some style ideas for Autumn/Winter. 

Thanks for reading!

Louise
xxxx